TensorFlow is a deep learning framework open sourced by Google in 2015. Google introduced TensorFlow.js in 2018 and it lets developers to run/train converted TensorFlow models on the browser or via Node.js.
Just last month, they released TensorFlow.js adapters for React Native which brings TensorFlow to mobile applications. At the time of writing, the package is still in alpha stage and not ready for production use.
This application is based on the example code provided by tfjs-react-native.
The complete code can be found here: https://github.com/t73liu/tfjs-starter
Installation
The easiest way to get started would be installing expo and initializing an empty project.
    yarn add global expo-cli
    # Creates a bare bones React Native application.
    expo init example
    cd example
Now we can start up the application to verify that it works.
expo start --tunnel
Next, we need to install the basic dependencies required by TensorFlow.js.
    yarn add @tensorflow/tfjs
    yarn add @tensorflow/tfjs-react-native@alpha
    yarn add @react-native-community/async-storage
    # Expo wrapper for yarn install; Downloads expo dependencies that work with
    # current version.
    expo install expo-gl
Prediction
In the App.js file, we will begin by adding a isTfReady state and only show
the main screen after TensorFlow.js has finished loading. AppLoading is an Expo
component that will show the application’s splash screen while the app is waiting
for resources to be prepared.
import React, { Component } from "react";
import { Text, View } from "react-native";
import { AppLoading } from "expo";
import * as tf from "@tensorflow/tfjs";
import "@tensorflow/tfjs-react-native";

export default class App extends Component {
  state = {
    isTfReady: false,
  };
  prepApp = async () => await tf.ready();
  setAppReady = () => this.setState({ isTfReady: true });
  render() {
    if (!this.state.isTfReady) {
      return (
        <AppLoading
          startAsync={this.prepApp}
          onFinish={this.setAppReady}
          onError={console.warn}
        />
      );
    }
    return (
      <View>
        <Text>Placeholder</Text>
      </View>
    );
  }
}
Before we create a component to predict objects in an image, we still need to download a pre-trained model. For this application we will be using MobileNet. This model is a convolutional neural network that is efficient enough to be run on mobile devices.
yarn add @tensorflow-models/mobilenet
Download a small JPEG image (i.e. 400 by 300) and place it in the assets
folder. We will be predicting the object in this image.
Now that we can create the component to handle the prediction logic.
- This component has a loading state since the model needs to be loaded and warmed up before it is ready to make predictions.
- This component takes a single property (
source) which refers to a local image and passes it to a TensorFlow.js util function that converts the image to binary data. - Another helper function converts the binary data into tensors (n-dimensional matrix).
- Finally the model uses tensors as inputs and outputs an array of predictions.
import React, { Component } from "react";
import { Text } from "react-native";
import * as tf from "@tensorflow/tfjs";
import { fetch as tfFetch } from "@tensorflow/tfjs-react-native";
import * as mobilenet from "@tensorflow-models/mobilenet";
export default class MobileNet extends Component {
  state = {
    isLoading: true,
    predictions: [],
  };
  async componentDidMount() {
    // Load and warms up MobileNet
    this.model = await mobilenet.load();
    await this.model.classify(tf.zeros([1, 224, 224, 3]));
    const predictions = await this.updatePredictions();
    this.setState({ predictions, isLoading: false });
  }
  updatePredictions = async () => {
    const { source } = this.props;
    if (this.model) {
      const imageAssetPath = Image.resolveAssetSource(source);
      const response = await tfFetch(
        imageAssetPath.uri,
        {},
        { isBinary: true }
      );
      const rawImageData = await response.arrayBuffer();
      const imageTensor = imageToTensor(rawImageData);
      const predictions = await this.model.classify(imageTensor);
      tf.dispose([imageTensor]);
      return predictions;
    }
  };
  render() {
    if (this.state.isLoading) <Text>Loading...</Text>;
    return <Text>{JSON.stringify(this.state.predictions)}</Text>;
  }
}
The imageToTensor helper function is implemented below. It decodes the binary
data using the jpeg-js library into an array of integers and removes
the alpha channel since MobileNet does not support/use that dimension.
yarn add jpeg-js
import * as tf from "@tensorflow/tfjs";
import { decode as jpegDecode } from "jpeg-js";
export function removeAlphaChannel(width, height, data) {
  const buffer = new Uint8Array(width * height * 3);
  let offset = 0; // offset into original data
  for (let i = 0; i < buffer.length; i += 3) {
    buffer[i] = data[offset];
    buffer[i + 1] = data[offset + 1];
    buffer[i + 2] = data[offset + 2];
    offset += 4;
  }
  return tf.tensor3d(buffer, [height, width, 3]);
}
export function imageToTensor(rawImageData) {
  const { width, height, data } = jpegDecode(rawImageData, { useTArray: true });
  return removeAlphaChannel(width, height, data);
}
Finally, we are ready to make predictions using the MobileNet. Replace the
placeholder text in App.js with our MobileNet component. The image that
was added to assets folder earlier will now be processed!
<MobileNet source={require("./assets/sample.jpg")} />
Finishing Touches
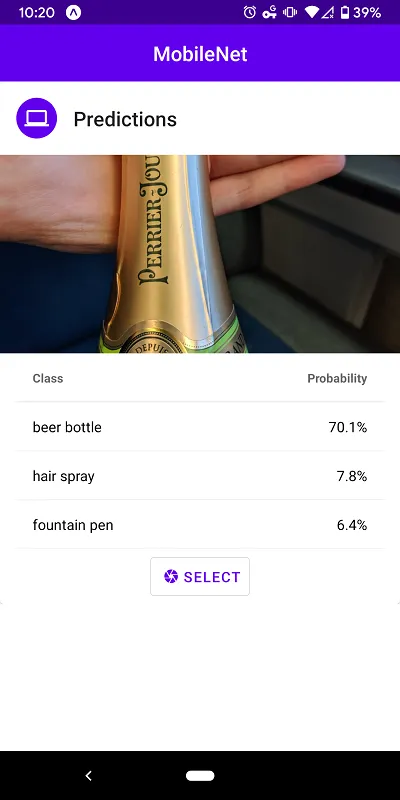
Before we wrap up, there are additional things we could do to clean up the application to make it more presentable. You can find the source code and demo in the References section.
- Add an UI component library to style the application using
react-native-paper - Add image picking functionality using
expo-image-picker - Add image resizing functionality to handle bigger pictures using
expo-image-manipulator
That’s it. It is very easy to add TensorFlow.js to your existing React Native applications.
Screenshots
